Server-Side JavaScript with Node.js

Server-Side JavaScript with Node.js
Node.js is a powerful platform that allows developers to write server-side applications using JavaScript. In this tutorial, we will explore the basics of Node.js, including its installation process, and learn how to create a simple “Hello World!” program.
We will also dive into Node.js documentation and discover how to build a static file server and a weather API using the Express framework.
What is Node.js?
Node.js is a JavaScript runtime built on Chrome’s V8 JavaScript engine. It allows developers to run JavaScript code outside of a web browser, making it ideal for server-side programming. Node.js uses an event-driven, non-blocking I/O model that makes it lightweight and efficient.
This model enables Node.js to handle a large number of concurrent connections while maintaining high performance.
Installation
To get started with Node.js, follow these steps:
- Visit the official Node.js website (nodejs.org) and download the latest version for your operating system (e.g., Windows, macOS, Linux).
- Run the downloaded installer and follow the instructions to complete the installation process.
- After installation, open the terminal and run the following command to check if Node.js is installed correctly:
![]()
This command will display the installed version of Node.js if the installation was successful.
Hello World!
Now, let’s create a simple “Hello World!” program using Node.js. Follow these steps:
- Open a text editor and create a new file named “hello.js”.
- In “hello.js”, add the following code:
![]()
![]()
Node.js will execute the script, and you should see the “Hello, World!” message printed in the terminal.
Node.js Documentation
Node.js provides comprehensive documentation that serves as a valuable resource for developers. The documentation covers various aspects of Node.js, including core modules, APIs, and best practices.
It is regularly updated and contains examples, explanations, and usage guidelines.
To access the Node.js documentation, you can visit the official Node.js website (nodejs.org) or use the command-line interface.
If you have installed Node.js correctly, you can open the Node.js command prompt or terminal and run the following command:
![]()
This command will display the available command-line options and provide links to the official documentation.
A Simple Static File Server
Node.js can be used to build static file servers that serve HTML, CSS, JavaScript, and other files. Here’s a step-by-step guide to creating a simple static file server using Node.js:
- Create a new directory for your project and navigate to it in the terminal.
- Run the following command to initialize a new Node.js project:
![]()
3. This command creates a new package.json file with default values.
4. Install the express module by running the following command:
![]()
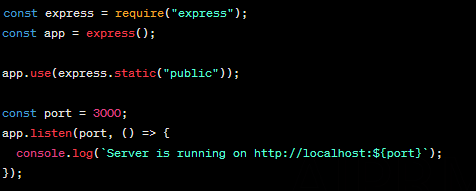
Create a new file named “server.js” and add the following code:

- This code sets up a basic Express server that serves static files from the “public” directory.
- Create a new directory named “public” and place your HTML, CSS, JavaScript, or other files inside it.
- Save the “server.js” file.
- To start the static file server, open the terminal and navigate to the project directory. Run the following command:
node server.js
The server will start, and you can access your files by visiting “http://localhost:3000” in your web browser.
Build a Weather API in Node.js with Express
Node.js, along with the Express framework, allows you to build powerful APIs quickly. Here’s a step-by-step guide to building a weather API using Node.js and Express:
- Set up a new project directory and navigate to it in the terminal.
- Run the following command to initialize a new Node.js project
npm init -y
Install the required dependencies by running the following commands
npm install express
npm install node-fetch
3. The express module is used for creating the API, and node-fetch is used for making HTTP requests to fetch weather data.
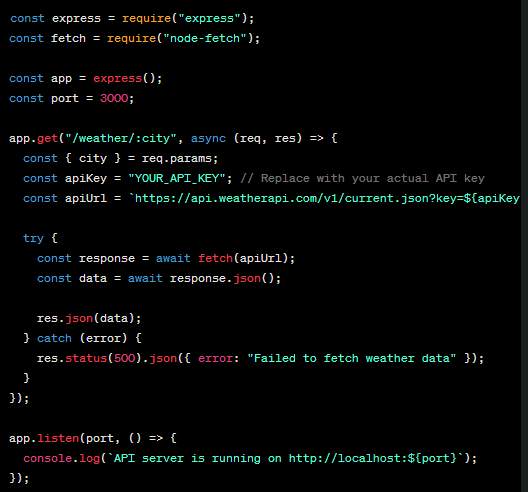
4. Create a new file named “app.js” and add the following code

- 5. This code sets up a basic Express server with a single route that fetches weather data from the WeatherAPI.com API based on the provided city parameter.6. Save the “app.js” file.To start the weather API server, open the terminal and navigate to the project directory. Run the following command:
node app.js
The API server will start, and you can make requests to fetch weather data by visiting “http://localhost:3000/weather/{city}” in your web browser or using tools like cURL or Postman. Replace “{city}” with the name of the desired city.
Benefits and Outcomes
Learning server-side JavaScript with Node.js offers several benefits:
- Code reuse: As Node.js uses JavaScript, you can reuse your existing front-end JavaScript knowledge and skills to develop server-side applications, reducing the learning curve.
- Efficiency and scalability: Node.js’s non-blocking, event-driven architecture allows for handling a large number of concurrent connections with optimal efficiency and scalability.
- Rich ecosystem: Node.js has a vast ecosystem of modules and libraries available through npm, enabling developers to leverage existing solutions and accelerate development.
- Increased productivity: With Node.js, you can build both the client-side and server-side components of your application using a single language, which can streamline development and improve productivity.
- Fast performance: Node.js’s performance characteristics make it suitable for building high-performance applications, especially those requiring real-time interactions or handling a large number of I/O operations.
By mastering Node.js, you can become proficient in server-side JavaScript development, enabling you to build robust and scalable applications with ease. Whether it’s creating static file servers or building powerful APIs, Node.js opens up a world of possibilities for web development.
